December 22, 2021

Building a DIY Smart Display using an Old LCD & Pi Zero!

It's been a while since I last wrote for this blog, let alone about a project, but over the past few months I have worked on multiple different projects that I hope to share on here over the next few weeks and months.

The finished project displaying the Raspberry Pi boot screen

I first embarked on this particular project after I had setup Home Assistant on my Home Server and wanted a way to display the information on the dashboard in my workshop. 

I was also inspired by the blank whiteboard I had hanging on my wall already and the smart home dashboards built by the members or r/homelab.

The destroyed pin-board and whiteboard

The first piece I needed was a whiteboard, with the one I used pictured above. As it was already partly destroyed by someone else, it was perfect for this project as I was throwing out the cork half anyway. 

The second piece I needed was a display. I sourced this from an old Dell All-In-One that had been stored under my desk for multiple years. I had turned it on in the past and knew that the panel worked.

To get the panel to work in the configuration, I needed to source a controller board to power the display as well as allow for a HDMI connection to it, without the rest of the computer being required.
As the display utilised the common LDVS display connection, which meant that I could order a compatible board for my specific display for US$33 on eBay. This also controls the backlight to allow for brightness control as well as turning the backlight on and off when needed. 

Finally, the display requires a way to load and display the Home Assistant dashboard via a browser. When I started this project the Raspberry Pi Zero 2 was not yet available, so the original Pi Zero W was used. This caused a few problems which will be detailed later on. 

Assembling the Display

First, the pin-board needed to be disassembled so that the cork half could be removed so that only the whiteboard remained. Luckily, the frame was only held together with staples and the panels were not attached to the frame, rather just sitting within grooves, so i was able to pull it apart nice and cleanly. 

The board completely disassembled

The next order of business was to modify the frame so that only the whiteboard half was framed. 

This was achieved by using a handsaw to cut additional corners into the wide grooved-edges of the frame so the mid bar could be replaced with the stronger side that was from the pin-board, which also makes the frame symmetrical. 

This frame was then held together using nails and glue, with the whiteboard section slid inside, which created a tight fit that held the board firmly in place. 

After this, the display panel was measured and a hole of the same size was cut out of the whiteboard. This was not perfectly straight and centred, but it was close enough for me to be pleased with the result. 

The screen inserted into the whiteboard


As the whiteboard portion was only made from cardboard with a whiteboard sticker, the cuts were not very neat, but they did the job. 

The messy cutting as seen from the back


To secure the screen to the whiteboard, electrical tape was used to join the screen bezel to the whiteboard as well as cover any imperfections in the cuts.

The tape applied to the front of the screen

This tape was applied to both the front and back, excluding where the display control board was, to make sure the display was secured in both directions. 

Now that the screen was attached to the whiteboard, the frame was reinstalled with it's modifications using nails and glue. 

The whiteboard with the frame attached

Now that the frame was attached, I needed a way to attach the electronics like the controller board without a risk of them shorting against the metal backing of the display. To solve this, a piece of wood was cut to fit inside the back of the frame so that it was flush, and it was then attached to the screen and whiteboard using double-sided tape. This also provides more contact between the screen and the frame, reducing the risk of it falling out. 

The backing wood with all the required holes and tape

Holes were required for the controller board as well as the backlight port, so that nothing was broken and everything could be accessed easily. 

All that was left to do was install the electronics!


All the electronics laid out on the back
 

All the components were attached using double-sided foam tape, as screws would interfere with the screen.
Absent from the above photo is the Raspberry Pi Zero W, which was attached via HDMI to the display controller. 

Setting up the Software

The first task was flashing an SD Card with an up-to date version of Raspberry Pi OS (previously Raspbian). I chose the Lite version as the Pi Zero W is not very powerful and needs as much processing power as possible dedicated to the browser window.

The first boot proved successful, as after the rainbow boot screen, the boot debugging appeared, followed by the initial setup. 

The boot debugging from the Pi Zero W

As this is not a tutorial, I will not be detailing every step to setting up the software. This is also because it will vary from setup to setup. 

The main things I configured were:

  • Setting the rotation to vertical as that is how I will mount it
  • Installing the web browser and it's related packages
  • Making a startup script that loads the webpage at each boot in kiosk mode

Sadly due to the poor performance, I have not yet been able to deploy this setup, but have some possible remedies which I discuss below. 

Future Improvements

The main issue currently is the performance of the Pi Zero W due to it's single core processor. At the time of building this, the Pi Zero 2, which is an upgraded Pi Zero W with 4 cores, was not available, but now that it is and I have acquired one, I hope to see if it rectifies my issues in the future so that I can finally deploy it. 

Another issue that I have a possible solution for is that the components currently protrude out the back of the frame, meaning that it would be resting against them if it was wall-mounted. The solution I hope to try is attaching the offcuts of wood from the other half of the frame to the back as spacers. This would also hide the components, making the setup look cleaner. 

Finally, something I have not found a solution for yet is powering both the Pi Zero 2 and the display with one power cable. As the Pi Zero 2 requires 5V over Micro USB and the Display 12V over a barrel, I currently have to run two power cables, but possibly with a step-down converter to 5V both could be powered off the 5V in the future. 

Final Thoughts

Now that this project is mostly complete, I am overall satisfied with the outcome, and the amount of room for improvement in the future.


As always, if you liked this project, you can find all my other projects here, and also through the tags below or in the sidebar. 

If you have any feedback, please leave it in the comments below,  and thanks again for reading!

March 31, 2021

How to set up a PiHole with PiVPN and Unbound - 2021 Edition


Since the last time I wrote about PiHole in 2019, that tutorial has accumulated over 25,000 views and is by far the most viewed post on this blog. Even to this day, that tutorial racks up hundreds of views every month, even though it is sorely out of date. 

A lot has changed since 2019, including a global pandemic, and more relevant to us, the ease of configuring and installing a network wide ad-blocker. As I alluded to earlier, the old tutorial is sorely out of date, making use of OpenVPN, and DNS-over-HTTPS, both of which are much easier to configure or have been superseded since. 

I realised how much easier it is now when I moved my PiHole and VPN to a VM on my new Homelab, which made me realise how sorely an update was needed. 

Without further ado, here is the much simplified 2021 edition of installing PiHole and PiVPN on a your Raspberry Pi or any Debian-based Linux Distro. 

If you need instructions on how to install Raspbian, please read that section of the old tutorial as nothing notable has changed on that front. If you are using something other than a Raspberry Pi, I recommend using Ubuntu Server, although any Debian-based distribution should be able to follow this tutorial.

All screenshots are from Ubuntu Server 18.04 LTS, although it should look mostly identical on other platforms, including Raspberry Pi.

Installing PiHole

Installing PiHole first is crucial, as it allows much of the auto configuration later to occur. 

  1. Copy and paste the following command into the terminal on your system:
    curl -sSL https://install.pi-hole.net | bash
  2. If the installer asks for a root password, provide it.
  3. After clicking ENTER a few times, you should be presented with a list of Upstream DNS Providers. This doesn't matter for now if you plan to install unbound, otherwise select whichever one you prefer. This can be changed later from the Web UI. 
  4. Leave the default list selected unless you prefer others.
  5. Leave both IPv4 and IPv6 selected unless you know your network only uses one or the other.
  6. Next you will be asked about setting a static IP. Select yes.
  7. Make note of the warning, as you should go to your router and set it as a static IP in the DHCP server so another device doesn't get given it.
    Go to your router's website to find out how for your model. 
  8. Select On for the web interface and web server / PHP when prompted.
  9. Select On for log queries if you're not a privacy freak, and then select your level of logging you are comfortable with. This will break some charts on the Web UI if 0 is not selected. 
  10. Now the installer will proceed to install the Web UI and other components.
  11. Once the installer finishes, now is a good time to reset the Web UI password from the default. This can be done with the following command:
    pihole -a -p followed by your new password twice. 
  12.  Once this is done, you can login to the Web UI with it's IP address and use the password you just created. 
  13. Once there, make sure everything shows up correctly and there are no errors. 

Configuring devices to use PiHole

Now that it is setup, you need to configure your devices to use PiHole. This can be done in one of 3 ways:

  1. Network-wide at the router level
  2. Network-wide with the PiHole as DHCP
  3. Specific devices only

They are all easy to set up, but some take longer than others. 

1. Network-wide at the router level

  1. Open your router's web control panel. The login can usually found on a sticker on the router. 
  2. Go to the LAN section, then the DHCP server. 
  3. Find the DNS server under this, and enter the IP address of the PiHole.
    (If you haven't set a static IP, this is also likely the place to do so)
  4.  Click save and it should propogate to all your devices the next time they connect.  

2. Network-wide with PiHole as DHCP

One awesome feature is that you can set the PiHole as the DHCP server which assigns IP addresses to devices on the network, which also solves the static IP issue. 

This method takes a few more steps, but is still quite simple.  

  1.  Open your router's web control panel. This can usually found on a sticker on the router. 
  2. Go to the LAN section, then the DHCP server. 
  3. Disable the DHCP server. Make sure it is off before proceeding.
    NOTE: This will prevent devices from easily connecting to the network. You will need to manually assign IPs for the time being
  4. Go to the PiHole Web UI and login
  5. Go to Settings and then the DHCP tab. 
  6. Toggle the DHCP Server to ON. 
  7. Make sure the Gateway/Router and IP range are set correctly. If you have a simple setup, it should be correct. 
  8. Scroll to the bottom and click Save. 
  9. Now if you connect a device to the network, it should be assigned an IP address automatically. 

3. Specific Devices Only

This is by far the easiest to configure, but can take the longest and varies between devices. 

  1. Go to your network settings and find the WiFi or Ethernet connection you have. 
  2.  However your device lets you, change both DNS servers to the IP Address of the PiHole. 
  3. Click Save.

Alternate Specific Device Only

One awesome feature that has been added to PiHole as part of version 5 is the ability to set different blocklists for different devices. 

One way you could set devices to not use PiHole is follow method 1 or 2 and add the devices to a group that has no blocklists or vice versa. This means that on devices with no lists everything is forwarded directly to the Upstream DNS provider with no blocks. 

These steps can also be used with method 3 if you want different lists for different devices.

  1. Go to the PiHole Web UI and go the the Group Management section. 
  2. Select Groups.

  3. Create a group for the device/s you do/don't want using PiHole's blocklists.
  4. Go to the Clients section. 
  5. Select a client device from the dropdown that you want to add to the list and click Add.
  6. Click on the group assignment and select the group/s you want the device to belong to. 
  7. These changes automatically save as you go. 
  8. If you want to add list specific black and whitelists, this can be done under the Domains section. 
  9. To add or remove blocklists/adlists, go to the adlists section and enter the URL to the list. 
  10. Select the group/groups you want the list to be used or not used by.

PiHole installation is now complete! 

For more information on things you can change, like local DNS, check out the PiHole documentation at https://docs.pi-hole.net/


Installing PiVPN

PiVPN has changed a lot since 2019. Since then, Wireguard has been released, which is a simpler, and better in every way VPN protocol. They also added auto-PiHole configuration so that profile names appear in the Web UI and you don't have to manually configure files to make it work. Also, split tunnels are much easier to configure (more on them later).

NOTE: If you cannot get a static IP from your ISP, or your dynamic one changes frequently, I highly recommend you looking into a Dynamic DNS service like afraid.org  which provides you with a URL to your IP and a script to update it to always point to the right place.
If you go this route, enter the URL created in Step 10 under the DNS Entry option.

  1. Run the following command in the terminal:
    curl -L https://install.pivpn.io | bash
  2. Enter the root password when asked.
  3. Eventually a screen should appear for the Installer. 
  4. Next it will start setting up a Static IP.
    If you are on anything other than Raspbian, it will show the following prompt, which is not a problem. 
  5. After that it will ask which user should hold the VPN configurations for clients. Select the default unless you've configured a separate user for this purpose. 
  6. Next you will be asked if you want WireGuard or OpenVPN. For this use case, I strongly recommend WireGuard, but if you want to stick with OpenVPN, this is where the tutorial ends and you need to look at the old tutorial. 
  7. After the packages are installed, it will ask for a port number. You can leave it on the default, but changing it can slightly improve security. Make sure whatever you set it to is not used by another service. Also make sure you remember what port you set for later.
  8. Confirm the port is correct. 
  9. Next it should detect the PiHole installation and ask if you want it to be used for the VPN. Select Yes. 
  10. Next it will ask if you want to use the IP or a URL to connect to the VPN. Unless you have a URL, select the IP Address. 
  11. PiVPN will generate the Server Keys. 
  12. Next it will ask about unattended-upgrades. It is recommended you enable it, as otherwise your installation may be vulnerable to attacks. 
  13. Now the install is done, it tells you how to create profiles. 
  14. The server will now reboot. 

  15. Once rebooted, log back in and run the following command:
    pivpn -a
     
  16. Enter the root password if prompted.
  17. Enter a client name.
  18. Now it will show where the file is saved. 
There are many ways to load the configuration onto your client device. If it is a mobile, you can use the handy QR Code feature to load the config file onto your device. 
To do this, simply:
  1. Run the command pivpn -qr and enter the profile name/number when prompted. 
  2. Scan the QR that appears on the screen with your WireGuard app. 
NOTE: The QR code is based off the config file in /etc/wireguard/configs and not the one in the home directory. If you want the QR code to include config file changes, you need to change that file instead.  
 
If you are using a computer or a device that cannot scan QR Codes, you will need to manually copy the configuration file to it. It is recommended to copy the version in /etc/wireguard/configs, but the one in ~/configs would work too.

Setting up the Tunnel

There are a few different ways you can configure a VPN. One is a Full Tunnel, where everything goes through it, although it is much slower. 

The second method is a Split Tunnel,  which is where only some traffic goes through it. This is optimal you only want DNS queries going to PiHole, while everything goes over the normal internet. This can also be used to access local IPs and therefore devices remotely. 

A Full Tunnel is configured by default, but a split tunnel requires a small amount of effort to work. 

These steps can be followed from either in the WireGuard program or by opening the file in a text editor.
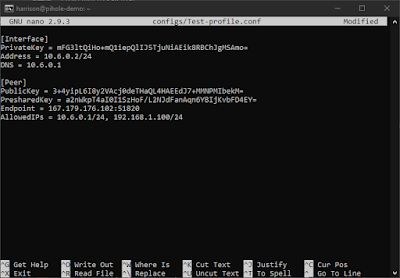
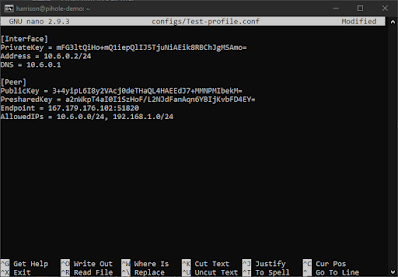
  1.  Locate the line beginning with AllowedIPs, and remove everything after the =. 
  2. Now we enter the IPs/ranges of IPs we want forwarded over the VPN. 
  3. To make sure DNS works, Enter 10.6.0.1/24 or 10.6.0.0/24, the second allowing access to all other devices connected over the VPN, while the first only allowing connections specifically to the PiHole. 

  4. Specifics
    Specific Devices/IPs
    If you want to be able to access local devices, enter their IPs followed by /24 or a range to pass through multiple, with the form *.*.*.0 followed by /24. Substitute the * for your IP range. 
    Ranges
    Ranges of Devices/IPs
  5. Load the file into your VPN program and you should be good to go!

Setting up Port Forwarding

This service requires a port to be opened to the internet, and this may not be possible in all cases depending on your ISP. 

  1. Go to your router's Web UI.
  2.  Find Port Forwarding, which is likely around a WAN section. This varies between models and manufacturers. 
  3. Use the port you assigned earlier as the internal and external ports and forward both TCP and UDP through it. If it asks for a internal device IP, enter the Pi's IP. 
  4. Click save and attempt to use your VPN. 

If the VPN refuses to work, your ISP may use CG-NAT (Carrier-Grade NAT). You will need to contact them and attempt to get it disabled, which may not always be possible. Without it disabled, Port Forwarding is not possible.

Installing Unbound

Unbound is a recursive, caching DNS resolver that allows for fast, secure DNS resolution with support for features like DNS-over-TLS and DNS-over-HTTPS. More info on how it works and the source of these instructions can be found here

Command-line

  1. Install unbound using the following command: sudo apt install unbound.
  2. Enter the sudo password when asked.
  3. Press Y to confirm the installation. 
  4. Once the install is finished, check that dns-root-data is installed with the command apt show dns-root-data. It should show info about the package.
    If the package is not on your platform, run the following command every 6 months:
    wget https://www.internic.net/domain/named.root -qO- | sudo tee /var/lib/unbound/root.hints
  5. Open the configuration using the following command: sudo nano /etc/unbound/unbound.conf.d/pi-hole.conf
  6. Paste the contents of the following link into the file:
    https://www.crankshafttech.com/unbound-config.txt
  7. Close and save the file.  
  8. Restart unbound to apply changes: sudo service unbound restart
  9. You can test if it is working using the following command: dig pi-hole.net @127.0.0.1 -p 5335 

PiHole Web UI

  1.  Go to the Settings section, then the DNS tab. 
  2. Untick all of the DNS Servers in the left columns. 
  3. Tick the Custom 1 Server and enter the following IP: 127.0.0.1#5335 
  4. Scroll to the bottom and click Save. 

OPTIONAL: You can enable DNSSEC to validate that DNS queries are legitimate, but it is not required. 

Conclusion

I hope that this tutorial is useful and easy to follow, and of course if you have any feedback or have a problem, please leave a comment or contact me on Facebook. 

As I think this is the right group of people to ask, if anyone knows of a way to monetise this site without using intrusive ads, please send me an email at [email protected] with your suggestions.

If you liked this tutorial, you can find all my other tutorials here, and also through the tags below. 


February 24, 2021

Why A Hypervisor Should Be The Base Of Every Server

Hypervisors allow for many virtual systems to be run on one physical device or cluster of devices, with benefits ranging from reduced energy use compared to running multiple physical servers to being able to easily and effectively deploy, backup and restore different environments. 

This post strays from what I usually post about to discuss some of the benefits that every IT person who has their own system running 24/7 should make use of, and why I plan to virtualise my servers. 

Throughout this post I will be using examples of features from VMWare Hypervisor, also known as ESXi. This is due to a number of reasons, mainly:

  1. ESXi has the largest marketshare by a huge amount 
  2. Licenses can be obtained legally for free from VMWare
  3. It's very easy to use and learn

With that out of the way, let's get into it!

 What is a Hypervisor?

A hypervisor is a software and/or firmware layer that allows virtual machines to be run on the hardware. A virtual machine is basically a box inside the physical computer that only has access to some processing power and storage of the physical computer's resources. This allows multiple virtual servers to be run at once on one machine. 

A hypervisor is whats called Type One Virtualisation, which is different from a Type Two like VirtualBox as it does not run on top of an OS such as Microsoft Windows. Instead it runs directly on the hardware, allowing more resources to be dedicated to the Virtual Machines and less to the Host overhead. 

VMWare ESXi is the most popular Type One Hypervisor, but some others are also used such as Citrix Hypervisor and Microsoft Hyper-V Server

Hypervisors have many benefits over running the software on bare metal, i.e. installing it directly onto the Hard Drive and not in a virtual environment. 

Benefits Of A Hypervisor

1. Easy Deployment and Management

The biggest advantage of using a hypervisor is the ability to easily deploy, manage and destroy software environments, all without touching the hardware of the server.

To begin with, ISO files are loaded into a datastore, which is basically a folder that can be used with ESXi to store disk images and Virtual Machine files. 

Once that is done, a virtual machine can be created using that ISO image. If something goes wrong and it either crashes or doesn't boot, all the settings you could need are at the tips of your fingers, including changing allocated system resources all the way to changing the virtual boot order. 

Once it is booted and working, you have the ability to reboot, shut down or forcefully power off the virtual system, all without turning the host off, retaining the ability to control the system. 

Also, when you want to change what you are running on your system or you want to run multiple VMs at the same time, just power on and off the VMs accordingly using the GUI without risking loosing connection from accidentally shutting down. 

2. Full Virtual Disk Snapshots

One of the other big advantages of using a hypervisor is that they have the ability to take 'snapshots' or 'savestates' of VMs, so that if you install an update or run a malicious script, you can revert back to a full working copy. This has saved me multiple times on other machines like laptops when I installed an update and the system failed to boot, with the snapshot enabling me to go back before the broken update and take a different path. 

This can be utilised when attempting to transition between OS versions in a VM, such as moving from Windows Server 2012 - 2016. Having the snapshots means that any changes that don't work can easily be reverted, and it also means you could work on a testing and a production version of a VM on the same hardware, of course utilising different virtual networks.  

Please note that this approach is not recommended in high stakes environments, but when there is only enough cash to buy one server, this is one way of effectively testing changes.

3. Scheduling of Management Tasks

Another useful feature is the ability to schedule tasks to be run at different times on the hypervisor. Paired with #2, this can allow for automated snapshots of VMs so that you are always prepared for the worst. 

As well as scheduling snapshots, other tasks can also be automated, such as turning VMs on and off or changing available resources. These tasks can be scheduled to run at various different times, such as after booting, hourly, or anywhere up to monthly. 

4. Power Savings

This point mainly applies to people that have multiple servers running that don't each require much processing power. Bundling them into one physical device makes management easier through one UI, as well as reducing power usage by more effectively utilising every watt instead of generating more waste heat and noise per application. 

It also has the added effect of requiring less hardware, therefore being cheaper to purchase and maintain, as well as being better for the environment by using less non-recyclable resources that are sent to landfill at the end of their life. 

5. Migration Between Physical Systems

The last major advantage of using a hypervisor is the ability to easily transfer a working system between different physical machines without having to make sure the hardware is compatible. As long as the hypervisor runs fine on the new hardware, the VM will too. 

This is achieved through the fact that all of the VM data is saved in files in the datastore that can be easily exported and imported into the new system's hypervisor. Once it is transferred, it will just boot up like normal, not even noticing the change in hardware. 

Of course there are exceptions, but they are not very common and this is still far more seamless then transferring bare metal systems to new hardware.

Summary

Based on these findings, I plan to make a follow up to this post to move my OpenMediaVault NAS, Docker containers and PiHole to a virtualised environment, utilising many of the features listed above. 


If there are any other benefits to a hypervisor I didn't list or major disadvantages, let me know in the comments below. 

If you liked this new style of content, let me know by leaving a comment, reaction or sharing it with your friends. 

If you liked this topic, you can find all my Server and Networking content here


EDIT #1: Added the ESXi logo

Ad